Mathmos Astro Lava Lamp Instructions

Position

Choose a position for your lamp on a level surface in a room with a temperature between 20 and 24°C or (69 to 75°F).

Place the lamp well away from;

  • children under 14 years to prevent breakage
  • sunlight to prevent fading
  • drafts to prevent slow operation
  • cold places to prevent freezing
  • hot places to prevent overheating
  • animals to prevent breakage
  • do not place on carpets or block the ventilation spaces beneath the lamp.

Set Up & Warm Up

IMPORTANT! – FITTING MATHMOS HALOGEN BULBS

  1. Handle the bulb with great care; halogen bulbs are extremely delicate.
  2. Allow the bulb to warm to room temperature.
  3. Made sure your lava lamp is in the correct position.
  4. Use a tissue to hold the bulb; deposits on our fingers can damage the bulb.GU10 bulbs: Carefully push the two prongs of the bulb down into the socket and turn it a quarter-turn clockwise until it stops rotating.
    SES bulbs: Carefully screw the bulb in and rotate clockwise for three turns or until it meets resistance.
  5. Place the bottle on the base delicately.
  6. Turn the lamp on using the inline switch.

Important

  1. Never touch the bulb or the lamp when it is on.
  2. Allow the light to cool for one hour before touching the bulb or lamp.
  3. Do not run your lava lamp for more than 6 hours at any one time.
  4. Always leave the bottle sitting on the base when you turn it on.

Put the bottle on the base with the screw cap at the top. If it is not sitting straight please rotate a little. Then plug it in and turn it on. NB. It is normal for the glass to have small air bubbles and moulding scars.

Warm up takes between 1 and 3 hours depending on the size of the model and the surrounding temperature. Stalagmite shapes may form during the warm up process, these will then melt and the lava will begin to flow.

Operation

Your Mathmos lava lamp will operate best after it has been used four or five times. For the first few times you may see small air bubbles in the lava. Please do not leave your lava lamp on for more than six hours a day; this will prolong the life of your lamp.

Overheating will shorten the light of the life of the lamp. Overheating is occurring if there is either one large bubble or many smaller ones. Never move or shake the lamp when it is in use or still warm as this causes irreparable clouding. It is normal for the base to become very hot.

Replacements

When your lava lamp has ended its life it will begin to go cloudy, the colours may fade and it will not move as well as it once did. This will happen after approximately 2000 hours of operation. You can then buy a new bottle at www.mathmos.com in the current colours available. Please note we do not refill bottles and please on no account open the bottle or add liquids.

If the bulb blows please replace it with one of the same type and wattage. Only fit the correct bulb, as stated on the label in the base. Again bulbs can be bought at www.mathmos.com as can many replacement parts.

Safety

This lamp has passed the relevant safety standards and carries the statutory guarantee of the country of purchase. The liquid in the lamps are not dangerous and can be disposed of normally. Never use a lamp if the bottle has been dropped as this will create weakness in the glass, obtain a replacement bottle and dispose of the old one. Do not leave the lamp unattended with small children. If the liquid is swallowed by mistake drink plenty of water. If it is spilt onto the skin or had contact with the eyes pour on cold water. If any symptoms appear please visit a doctor.

Please retain these instructions should be retained for future use. If you have further questions about your lava lamp please visit Lava Lamp FAQs


Mathmos Candle Lava Lamp Instructions

Back ▲

Fireflow, Pod and Pod+

WARNING!! THIS IS NOT A TOY!

Position

Choose a position for your lamp on a level surface in a room with a temperature between 20 and 24°C or (69 to 75°F).

Place the lamp well away from;

  • children under 14 years to prevent breakage
  • sunlight to prevent fading
  • drafts to prevent slow operation
  • cold places to prevent freezing
  • hot places to prevent overheating
  • animals to prevent breakage
  • do not place on carpets or block the ventilation spaces beneath the lamp.

Set Up & Warm Up


pod_fireflow_candle_lava_lamp_instructions

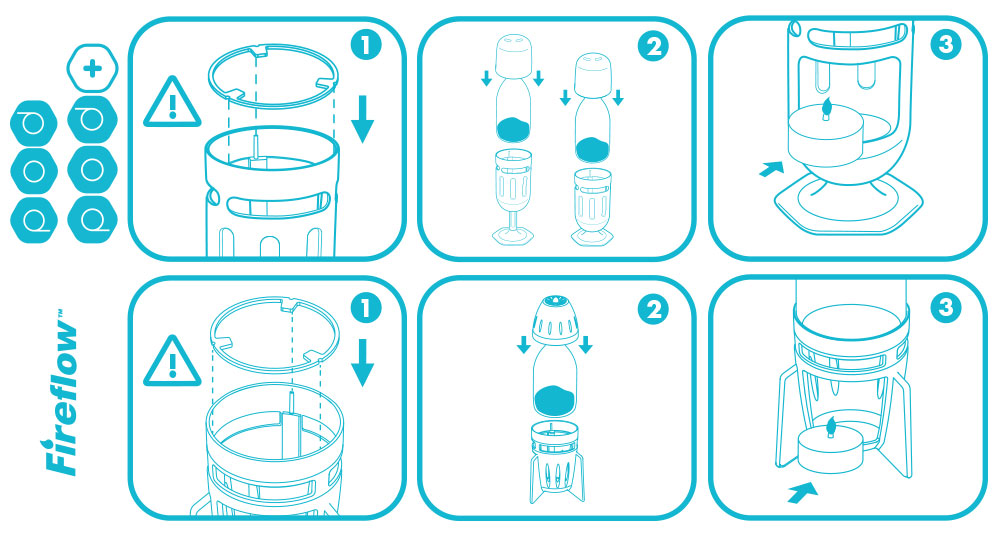
  1. Place the round metal insert into the designated position in the base.
  2. Place the bottle on top and the metal cap on top of the bottle.
  3. Light the tea light and insert into the opening in the base.

Between 20 – 40 minutes depending on the surrounding temperature and the brand of tea light used.

TURN OFF After 4 hrs use, or before, gently blow the tea light out without touching the product as it will now be hot.

Operation

Never use for more than 4 hours at any one time as the product will become dangerously hot.

Never touch the bottle or metal parts whilst the product is in operation as they become very hot.

Always allow one hour after use to let the product cool down before touching it or the tea light.

  • Never move or shake the bottle when in use or for one hour afterwards as this will cause irreparable clouding.
  • Use only the small 4-hour tea lights as the long-lasting ones will burn for too long.
  • Please use a new tea light every time you use the product to avoid changing it whilst mid-operation.
  • Please clean the base of the bottle before use every time to clear any soot that the tea light may have deposited onto the bottle.
  • Do not leave the product unattended with small children or animals.
  • The contents of the bottle are not dangerous and can be disposed of normally.
  • Should the liquids be spilt onto the skin or come into contact with the eyes pour on cool water, if symptoms appear please visit the doctor.

Use of candles

Always read and follow the manufacturer’s instructions supplied with candles.

  1. Never leave a burning candle unattended.
  2. Burn the candle out of the reach of children and pets.
  3. Trim the wick to about 1cm (1/2”) before lighting.
  4. Do not burn the candle on or near anything that can catch fire.
  5. Always read and follow the manufacturer’s instructions supplied with candles. Remove all packaging before use.
  6. Do not place candles in a draft.
  7. Keep the wax pool clear of matches and other debris to avoid flaming If the candle overheats and flares, cover with a damp cloth.
  8. Do not use water to extinguish the flame.

Mathmos Neo Lava Lamp Instructions

Back ▲

Position

  • Choose a position inside on a clean and horizontal surface.
  • Do not place near sources of heat or cold, such as a heater or air conditioner. The product operates at its best in a room between 68º F/20º C and 75º F/24ºC.
  • Keep the cable away from heated surfaces.
  • This product is not suitable to be set up on glass surfaces.
  • For best performance we recommend you keep the product away from: sunlight to prevent fading drafts and cold places to prevent slow operation and freezing, hot places to prevent overheating.
  • For indoor use only.

Children

This product has been manufactured to relevant safety standards. However, for use with children we suggest to ensure that the product is not knocked to the floor and that you fix the product to a surface, see below. When Neo is not fully assembled do not leave it in reach of children as it contains small parts.

Set Up & Warm Up


mathmos_neo_lava_lamp_instructions

This product comes with 8 components:

  1. Base
  2. Bottle
  3. Long arm piece
  4. M4 Screw x 1
  5. M2.5 Allen key x 1
  6. Switching power adapter
  7. UK interchangeable plug
  8. EU interchangeable plug

To assemble:

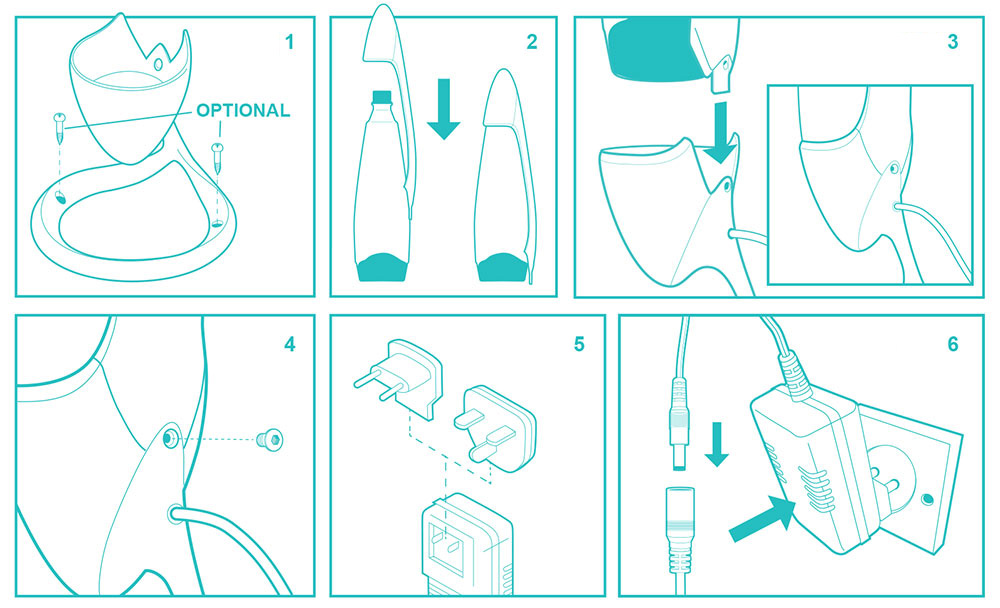
  1. Place the base on a stable and flat surface. OPTIONAL: The base ring has x2 screw holes that allow you to fix the base (if required) onto a suitable flat even surface. We recommend you use suitable screws (x2 of the same specification) for the desired surface you will be fixing the base onto. You must ensure the base is positioned and secured safely onto to the desired surface. Once fixed, the base should be free from movement at all times. (fixing screws not supplied) (figure 1)
  2. Take the bottle and place the long arm piece over the top of the bottle and push in place (figure 2)
  3. Firmly hold the bottle and arm piece using both hands and carefully place into the base and line up with the screw hole on the base – please do this by slotting the arm piece into the cavity (below the screw hole) in the base. (figure 3)
  4. Insert the screw provided and tighten with the allen key till firm (figure 4)
  5. Slide the correct plug (EU plug or UK plug) onto the switching power adapter until it clicks (figure 5)
  6. Plug the switching adaptor provided into base cable port. Plug the product in and turn it on (figure 6)

Warm up takes between 1-3 hours depending on the surrounding temperature. Stalagmite shapes may form during the warm up process, these will then melt and the lava will begin to flow. It is normal for the glass to have small air bubbles and moulding scars.

Operation

  • Your Mathmos product will operate best after it has been used four or five times. For the first few times you may see small air bubbles in the lava. Please note the heating time will decrease after several uses.
  • Please do not leave the product on for more than six hours a day or allow it to overheat; this will prolong the life of your product. Overheating will shorten the life of the product; if it is overheating there will be either only one large bubble at the top of the bottle or a lot of very small bubbles.
  • Never move or shake the product when it is in use or still warm, as this causes irreparable clouding.

Replacement

When your product has ended its life it will begin to go cloudy, the colours may fade and it will not move as well as it once did. This will happen after approximately 2000 hours in operation. Whether your product has ended its life or when you wish to have an alternative colour combination, visit our website at www.mathmos.com for more information on a replacement bottle or full product. Please note we do not refill bottles. Please on no account open the secure cap and add liquids.

If the bulb blows, please replace it with one of the same type and wattage. Only fit the correct bulb, as stated in the label in the base. Visit our website at www.mathmos.com for more information on replacement bulbs.

IMPORTANT! Always allow your product to cool down completely prior to handling or moving the product.
Once your product has completely cooled, using the allen key provided to unscrew and remove the back screw out (keep these components safe). Carefully, holding both the bottle and arm piece, lift and remove the bottle and arm piece from the base. Carefully take the arm piece off the bottle and place it onto the bottle you would like to use. Now refer to ‘set up’ for instructions on how to assemble.

Safety Instructions

  • This product carries the statutory guarantee of the country of purchase and meets all the applicable standards requirements.Use this product only for its intended use as described in these instructions. Do not use attachments not recommended by the manufacturer.
  • Do not use any other means to heat up the bottle other than the bulb provided nor attempt to cool it down artificially.
  • Do not operate the product for more than 6 hours a day.
  • The liquids in the product are not dangerous and can be disposed of normally (for details, see our online FAQ’s at www.mathmos.com). If the liquid is swallowed by mistake, drink plenty of water. If any symptoms appear, please visit a doctor.
  • Never use this product if the bottle has been dropped as this will create weakness; obtain a replacement bottle and dispose of the old one. If the contents are spilt, please dispose of as much liquid and lava as you can remove, then use recommended cleaning methods for removing coloured water and wax for whatever floor you have.

To reduce the risk of burns, electric shock, or injury to persons:

  • Unplug from outlet before putting on or taking off parts or before cleaning.
  • Never operate this product if it has a damaged cord or plug, if it is not working properly, if it has been dropped or damaged, or if it has been submerged in water.
  • The external flexible cable of this product cannot be replaced. If the cable is damaged, the product shall be discarded.
  • To disconnect, turn the switch to the off position, then remove plug from outlet.
  • Never touch the bulb if the product is switched on or if it has just been switched off in order to avoid burning. To replace a defective bulb, unplug the product and let it cool down sufficiently.

The product manufacturer cannot be made liable for damage or injury caused by improper handling, installation or use of its products.

Mathmos Telstar Lava Lamp Instructions

Back ▲

Position

Choose a position for your lamp on a level surface in a room with a temperature between 20 and 24°C or (69 to 75°F).

Place the lamp well away from;

  • children under 14 years to prevent breakage
  • sunlight to prevent fading
  • drafts to prevent slow operation
  • cold places to prevent freezing
  • hot places to prevent overheating
  • animals to prevent breakage
  • do not place on carpets or block the ventilation spaces beneath the lamp.

Set Up & Warm Up

IMPORTANT! – FITTING MATHMOS HALOGEN BULBS

  1. Handle the bulb with great care; halogen bulbs are extremely delicate.
  2. Allow the bulb to warm to room temperature.
  3. Made sure your lava lamp is in the correct position.
  4. Use a tissue to hold the bulb; deposits on our fingers can damage the bulb.

    GU10 bulbs: Carefully push the two prongs of the bulb down into the socket and turn it a quarter-turn clockwise until it stops rotating.
    SES bulbs: Carefully screw the bulb in and rotate clockwise for three turns or until it meets resistance.

  5. Place the bottle on the base delicately.
  6. Turn the lamp on using the inline switch.

Important

  1. Never touch the bulb or the lamp when it is on.
  2. Allow the light to cool for one hour before touching the bulb or lamp.
  3. Do not run your lava lamp for more than 6 hours at any one time.
  4. Always leave the bottle sitting on the base when you turn it on.

Put the bottle on the base with the screw cap at the top. If it is not sitting straight please rotate a little. Then plug it in and turn it on. NB. It is normal for the glass to have small air bubbles and moulding scars.

Warm up takes between 1 and 3 hours depending on the size of the model and the surrounding temperature. Stalagmite shapes may form during the warm up process, these will then melt and the lava will begin to flow.

Operation

Your Mathmos lava lamp will operate best after it has been used four or five times. For the first few times you may see small air bubbles in the lava. Please do not leave your lava lamp on for more than six hours a day; this will prolong the life of your lamp.

Overheating will shorten the light of the life of the lamp. Overheating is occurring if there is either one large bubble or many smaller ones. Never move or shake the lamp when it is in use or still warm as this causes irreparable clouding. It is normal for the base to become very hot.

Replacements

When your lava lamp has ended its life it will begin to go cloudy, the colours may fade and it will not move as well as it once did. This will happen after approximately 2000 hours of operation. You can then buy a new bottle at www.mathmos.com in the current colours available. Please note we do not refill bottles and please on no account open the bottle or add liquids.

If the bulb blows please replace it with one of the same type and wattage. Only fit the correct bulb, as stated on the label in the base. Again bulbs can be bought at www.mathmos.com as can many replacement parts.

Safety

This lamp has passed the relevant safety standards and carries the statutory guarantee of the country of purchase. The liquid in the lamps are not dangerous and can be disposed of normally. Never use a lamp if the bottle has been dropped as this will create weakness in the glass, obtain a replacement bottle and dispose of the old one. Do not leave the lamp unattended with small children. If the liquid is swallowed by mistake drink plenty of water. If it is spilt onto the skin or had contact with the eyes pour on cold water. If any symptoms appear please visit a doctor.

Please retain these instructions should be retained for future use. If you have further questions about your lava lamp please visit Lava Lamp FAQs

Mathmos iO Lava Lamp Instructions

Back ▲

Position

For indoor use only. Choose a position on a clean, sturdy and horizontal surface.

Do not place near sources of heat or cold, such as a heater or air conditioner. The product operates at its best in a room between 20º C / 68º F and 24ºC / 75º F.

Keep the cable away from heated surfaces.

For best performance, we recommend you keep the product away from sunlight to prevent fading, drafts and cold places to prevent slow operation and freezing, hot places to prevent overheating.

Place the base on a stable and flat surface. OPTIONAL: The base has x 4 screw holes that allow you to fix it (if required) onto a suitable surface. We recommend you use suitable screws (x 4 of the same specification) for the desired surface you will be fixing the base onto. You must ensure the base is positioned safely onto the desired surface.

Set Up & Warm Up


mathmos_io_giant_lava_lamp_instructions

This product comes with 8 components:

  1. Base
  2. R7s Bulb
  3. Glass Shield
  4. Heat Ring
  5. Bottle
  6. Cast Metal Cap
  7. M4 Screw x 2
  8. Allen Key x 1

To Assemble:

Avoid handling bulbs with your bare hands, instead, use a soft cloth or similar.

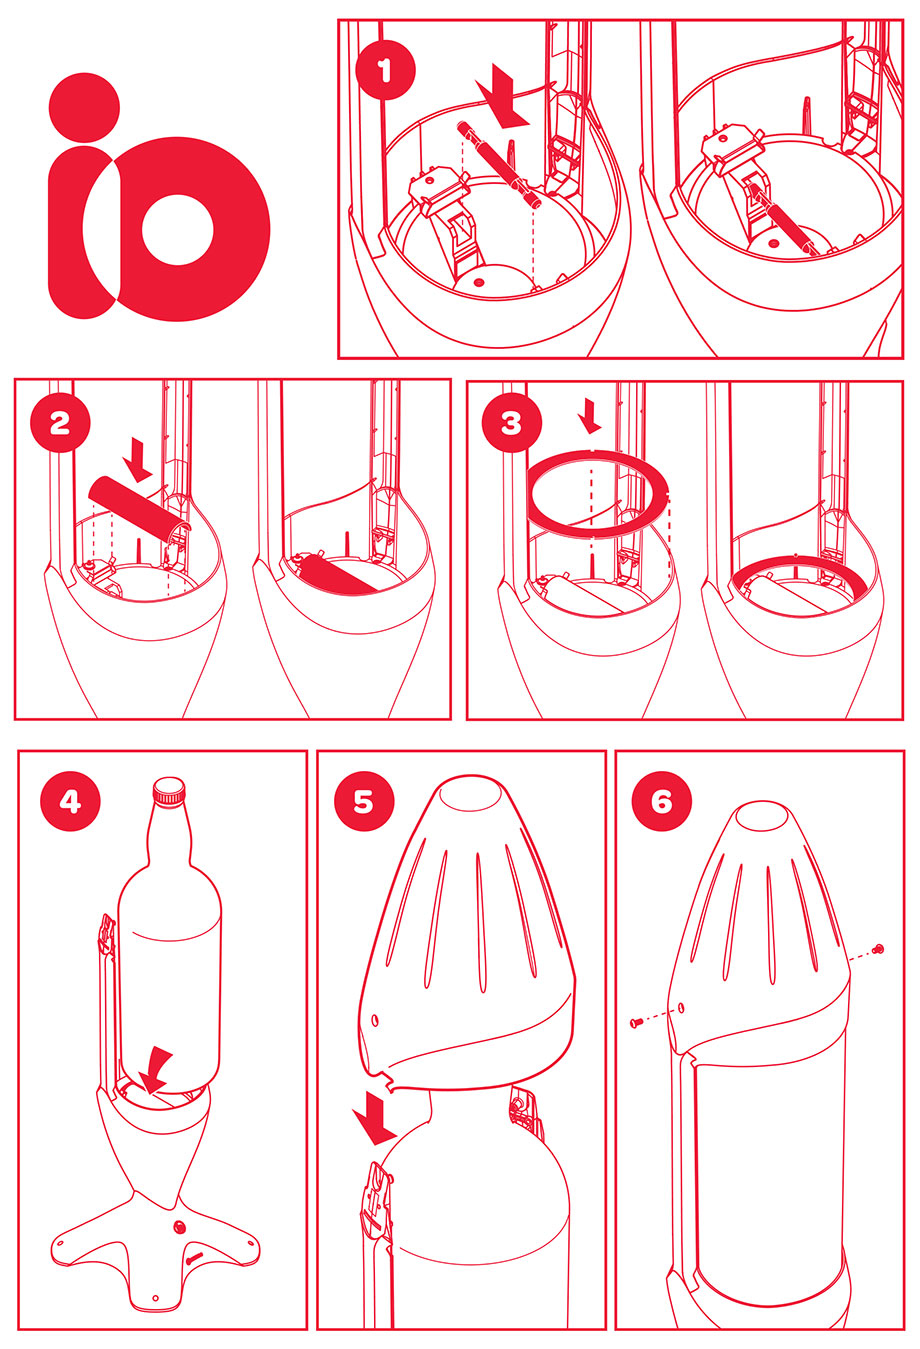
  1. Fit the bulb into the product by pushing one end in and springing it into place between the lamp holder contacts. Ensure that each end of the bulb is sitting properly in the lampholder.
  2. Fit the glass shield in position. It is essential that this part is fitted in place before use.
  3. Fit the heat ring in position as shown.
  4. Carefully lift the bottle by the neck and place the bottle onto the heat ring from the front of the product. Ensuring it is vertical and stable.
  5. Fit the cast metal cap in place. Ensure that each arm fits into the slots in the cap and gently wriggle into position. Do not force as this can damage the product and may break the bottle.
  6. Insert the screw provided and tighten with the allen key provided until firm. Do not over tighten. Repeat for the other arm.

Warm up takes between 1-3 hours depending on the surrounding temperature. Stalagmite shapes may form during the warm up process, these will then melt and the lava will begin to flow.

Operation

  • Your Mathmos product will operate best after it has been used four or five times. For the first few times, you may see small air bubbles in the lava. Please note the heating time will decrease after several uses.
  • Please do not leave the product on for more than six hours a day or allow it to overheat; this will prolong the life of your product. Overheating will shorten the life of the product; if it is overheating there will be either only one large bubble at the top of the bottle or a lot of very small bubbles.
  • Never move or shake the product when it is in use or still warm, as this causes irreparable clouding.
  • It is normal for the glass to have small air bubbles and moulding scars.

Replacements

When your product has ended its life it will begin to go cloudy, the colours may fade and it will not move as well as it once did. This will happen after approximately 2000 hours in operation. Whether your product has ended its life or when you wish to have an alternative colour combination, visit our website at www.mathmos.com for more information on a replacement bottle or full product. Please note we do not refill bottles. Please on no account open the secure cap and add liquids.

If the bulb blows, please replace it with one of the same type and wattage. Only fit the correct bulb, as stated in the label in the base. Visit our website at www.mathmos.com for more information on replacement bulbs.

IMPORTANT! Always allow your product to cool down completely prior to handling or moving the product. Once your product has completely cooled, using the allen key provided to unscrew and remove the side screws (keep these components safe). Carefully, lift the cap off. Lift and remove the bottle from the base.

Place the replacement bottle onto the product. Now refer to set up for instructions on how to assemble.

Safety Points

  • This product carries the statutory guarantee of the country of purchase and meets all the applicable standards requirements.
  • This product is only suitable for connection to a 220 – 240V ~ 50Hz mains supply. It must only be fitted with a 3A fuse.
  • This fitting is a Class II, Double Insulated product and does not require an Earth.
  • Place the product well away from children under 14 years to prevent breakage.
  • If the glass shield is broken or cracked then it must be replaced immediately, please contact Mathmos.
  • Use this product only for its intended use as described in these instructions. Do not use attachments not recommended by the manufacturer.
  • Do not use any other means to heat up the bottle other than the bulb provided nor attempt to cool it down artificially.
  • Do not operate the product for more than 6 hours a day.
  • The liquids in the product are not dangerous and can be disposed of normally (for details, see our online FAQs at www.mathmos.com). If the liquid is swallowed by mistake, drink plenty of water. If any symptoms appear, please visit a doctor.
  • Never use this product if the bottle has been dropped as this will create weakness; obtain a replacement bottle and dispose of the old one. If the contents are spilt, please dispose of as much liquid and lava as you can remove, then use recommended cleaning methods for removing coloured water and wax for whatever floor you have.

To reduce the risk of burns, electric shock, or injury to persons:

  • Unplug from the outlet before putting on or taking off parts or before cleaning.
  • Never operate this product if it has a damaged cord or plug or if it is not working properly, if it has been dropped or damaged, or if it has been submerged in water.
  • The external flexible cable of this product cannot be replaced. If the cable is damaged, the product shall be discarded.
  • To disconnect, turn the switch to the off position, then remove the plug from the outlet.
  • Never touch the bulb if the product is switched on or if it has just been switched off in order to avoid burning. To replace a defective bulb, unplug the product and let it cool down sufficiently.

The product manufacturer cannot be made liable for damage or injury caused by improper handling, installation or use of its products.

Waste electrical products should not be disposed of with household waste. Please recycle where facilities exist. Check with your Local Authority or retailer for recycling advice.

Mathmos Saturn Lava Lamp Instructions

Back ▲

Box Contents

Saturn comes packaged in two boxes;
Box 1: Tripod Stand, R7s Bulb, Spun Base with Cable Kit, Top Cap
Box 2: Filled bottle

Position

Saturn is for indoor use only. Choose your position carefully, especially if Saturn is to be used in public areas. Ensure that the cable can reach the power socket location without being stretched and does not become a trip hazard. Choose a position on a robust flat surface able to bear its weight. Saturn operates at its best in a room between 20º C / 68º F and 24ºC / 75º F.

For best performance we recommend you keep the product away from:

  • Direct sunlight to prevent fading.
  • Drafts and cold places, such as an air conditioner, to prevent slow operation and freezing.
  • Hot places, such as a heater, to prevent overheating.
  • cold places to prevent freezing
  • hot places to prevent overheating
  • Keep the cable away from heated surfaces.

OPTIONAL: The feet on the stand have Bolt / Screw slots that allow you to fix the lamp onto a suitable surface. We recommend you use suitable Bolts or screws (x 4 of the same specification) for fixing the base. You must ensure the base is positioned safely onto the floor.

Assembly & Warm Up

For a full visual guidance recommend you watch the video.

Box 1: (the larger box)

  1. Open and carefully take out the cap and the base.
  2. Place the lamp in position.
  3. Fit the bulb into the product by pushing one end in and springing it into place between the lamp holder contacts. (diagram 1). Ensure that each end of the bulb is sitting properly in the lamp holder.

Box 2: (the smaller box – bottle)

  1. Take great care removing the bottle from the box. It is both heavy and delicate.
  2. Open the box by removing the tear off strip.
  3. Open the flaps and remove the top cardboard insert and set this aside.
  4. Using the handles on the side of the box, carefully lower the box so the long side is on the floor.
  5. Place the cardboard insert set aside earlier in front of the box at the opening to protect the bottle as it comes out of the box.
  6. Pull the bottle out of the box using the neck of the bottle and as you do this move the bottle upright to stand it on the insert. (diagram 2)
  7. Slowly lift the bottle and then lower the bottle into position on the base, ensuring that it fits neatly into the base spinning. NB. This operation may require two people.
  8. Fit the cap on the top of the bottle.

Warm up takes between 3 to 4 hours depending on the ambient temperature. Stalagmite shapes may form during the warm up process, these will then melt and the lava will begin to flow. You may want to use a time clock with Saturn so that it turns on automatically.

Operation

Saturn will operate best after it has been used four or five times. For the first few times you may see small air bubbles in the lava. It is normal for the glass to have small air bubbles and moulding scars. Saturn can run for up to 12 hours once warmed up (during one operating cycle). Please allow Saturn to fully cool before running it again. Do not allow Saturn to overheat as this will shorten the life of the lava. If it is overheating there will be either only one large bubble at the top of the bottle or a lot of very small bubbles. NB. Never move the product when it is in use or still warm, as this causes irreparable clouding.

Replacements

When your Saturn has ended its life, it will begin to go cloudy, the colours may fade and it will not move as well as it once did. This will happen after approximately 2000 hours in operation. Whether your product has end edits life or when you wish to have an alternative colour combination, visit our website at www.mathmos.com for more information on a replacement bottle or full product. NB. Please on no account open the secure cap and add liquids.

Changing the Bulb

  1. It is essential to allow your product to cool down completely prior to handling or maintaining the product.
  2. Once your product has completely cooled, carefully lift out the bottle from the base and set down on a sturdy surface safely away from the base.
  3. Avoid handling the bulb with your bare hands, instead use a soft cloth or similar.
  4. Fit the bulb into the product by pushing one end in and springing it into place between the lamp holder contacts. (diagram 2).
  5. Ensure that each end of the bulb is sitting properly in the lamp holder. If the bulb blows, please replace it with one of the same type and wattage. Only fit the correct bulb, as started in the label in the base.
  6. Visit www.mathmos.com for more information or to purchase are placement bulb.

Safety

  • This product carries the statutory guarantee of the country of purchase and meets all the applicable standards requirements.
  • This product is only suitable for connection to a 220 – 240V ~ 50Hzmains supply. It must only be fitted with a 3A fuse.
  • If this is to be installed in a public space then we recommend fitting it to a RCD device.
  • This fitting is a Class II, Double Insulated product and does not require an Earth.
  • Place the product well away from children under 14 years to prevent breakage.
  • Use this product only for its intended use as described in these instructions. Do not use attachments not recommended by the manufacturer.
  • Do not use any other means to heat up the bottle other than the bulb provided nor attempt to cool it down artificially.
  • Do not operate the product for more than 12 hours once warmed up(during one operating cycle).
  • The liquids in the product are not dangerous and can be disposed of normally (for details, see our online FAQ's at www.mathmos.com). If the liquid is swallowed by mistake, drink plenty of water. If any symptoms appear, please visit a doctor.
  • Never use this product if the bottle has been dropped as this will create weakness; obtain a replacement bottle and dispose of the old one. If the contents are spilled please dispose of as much liquid and lava as you can remove, then use recommended cleaning methods for removing coloured water and wax for whatever floor you have.

To reduce the risk of burns, electric shock, or injury:

  • Unplug from mains outlet before putting on or taking off parts or before cleaning.
  • Never operate this product if it has a damaged cord or plug, if it is notworking properly, if it has been dropped or damaged, or if it has been submerged in water.
  • The external flexible cable of this product cannot be replaced. If the cableis damaged, please contact Mathmos
  • To disconnect, turn the switch to the off position, then remove plug from outlet.
  • Never touch the bulb if the product is switched on or if it has just been switched off in order to avoid burning. To replace a defective bulb, unplug the product and let it cool down sufficiently.

NB. Mathmos Ltd. cannot be made liable for damage or injury caused by improper handling, installation or use of its products.

Waste electrical products should not be disposed of with household waste. Please recycle where facilities exist. Check with your Local Authority or retailer for recycling advice.

Mathmos Rokit Lava Lamp Instructions

Back ▲

Rokit Box Contents

This product comes with six components:

  1. Base Assembly
  2. 3 x 80W R7s Bulbs
  3. Glass Shield and Screw x 2
  4. Allen key
  5. Bottle
  6. Spun Metal Cap

Position

  • For indoor use only. Choose a position on a clean, sturdy and horizontal surface.
  • Do not place near sources of heat or cold, such as a heater or air conditioner. The product operates at its best in a room between 20º C / 68º F and 24ºC / 75º F.
  • Keep the cable away from heated surfaces.
  • For best performance we recommend you keep the product away from: sunlight to prevent fading, drafts and cold places to prevent slow operation and freezing, hot places to prevent overheating.
  • Place the base on a stable and flat surface.

Assembly & Warm-up

Mathmos Rokit Lava Lamp Instructions

This product comes with 8 components:

  1. Avoid handling bulbs with your bare hands, instead use a soft cloth or similar. The oil from hands causes hot spots and may cause the bulb to fail prematurely.
  2. Fit the bulb into the product by pushing one end in and springing it into place between the lampholder contacts. Ensure that each end of the bulb is sitting properly in the lampholder.
  3. Fit the glass shield in position. It is essential that this part is fitted in place before use.
  4. Carefully lift the bottle by the neck and place the bottle onto the heat ring from the front of the product. Ensuring it is vertical and stable.
  5. Fit the spun metal cap in place.

Warm up takes between 1-3 hours depending on the surrounding temperature. Stalagmite shapes may form during the warm up process, these will then melt and the lava will begin to flow.

Operation

  • Your Mathmos product will operate best after it has been used four or five times. For the first few times you may see small air bubbles in the lava. Please note the heating time will decrease after several uses.
  • Please do not leave the product on for more than six hours a day or allow it to overheat; this will prolong the life of your product. Overheating will shorten the life of the product; if it is overheating there will be either only one large bubble at the top of the bottle or a lot of very small bubbles.
  • Never move or shake the product when it is in use or still warm, as this causes irreparable clouding.
  • It is normal for the glass to have small air bubbles and moulding scars.

Replacements

At the end of its life cycle your product will start to become cloudy, the colors will fade and the lava will not circulate as well as before. This will happen after about 2000 hours of use. Whether your product has reached its end of life or you want a different colour combination, visit our Spares section for more information on replacement bottles.

If the bulb is burnt out, replace it with a bulb of the same type and wattage. Only use an appropriate bulb as indicated on the label located on the base. For more information on replacement bulbs, visit our Spares section.

IMPORTANT! Allow your product to cool completely before picking it up or moving it. Once your product has completely cooled, use the supplied Allen key to unscrew and remove the screws located on the sides (keep its parts carefully). Carefully lift the cap. Lift and remove the bottle from the base.
Place the spare bottle on the product and see the ‘assembly’ section for assembly instructions.

Safety Points

  • This product carries the statutory guarantee of the country of purchase and meets all the applicable standards requirements.
  • This product is only suitable for connection to a 220 – 240V ~ 50Hz mains supply. It must only be fitted with a 3A fuse.
  • This fitting is a Class II, Double Insulated product and does not require an Earth.
  • Place the product well away from children under 14 years to prevent breakage.
  • If the glass shield is broken or cracked then it must be replaced immediately, please contact Mathmos.
  • Use this product only for its intended use as described in these instructions. Do not use attachments not recommended by the manufacturer.
  • Do not use any other means to heat the bottle other than the bulb provided nor attempt to cool it down artificially.
  • Do not operate the product for more than 6 hours a day.
  • The liquids in the product are not dangerous and can be disposed of normally (for details, see our online FAQ’s at www.mathmos.com). If the liquid is swallowed by mistake, drink plenty of water. If any symptoms appear, please visit a doctor.
  • Never use this product if the bottle has been dropped as this will create weakness; obtain a replacement bottle and dispose of the old one. If the contents are spilt, please dispose of as much liquid and lava as you can remove, then use recommended cleaning methods for removing coloured water and wax for whatever floor you have.

To reduce the risk of burns, electric shock, or injury to persons:

  • Unplug from the outlet before putting on or taking off parts or before cleaning.
  • Never operate this product if it has a damaged cord or plug or if it is not working properly, if it has been dropped or damaged, or if it has been submerged in water.
  • The external flexible cable of this product cannot be replaced. If the cable is damaged, the product shall be discarded.
  • To disconnect, turn the switch to the off position, then remove the plug from the outlet.
  • Never touch the bulb if the product is switched on or if it has just been switched off to avoid burning. To replace a defective bulb, unplug the product and let it cool down sufficiently.

NB. Mathmos Ltd. cannot be made liable for damage or injury caused by improper handling, installation or use of its products.

Waste electrical products should not be disposed of with household waste. Please recycle where facilities exist. Check with your Local Authority or retailer for recycling advice.

Mathmos Evo Lava Lamp Instructions

Back ▲

Position

Please wait 24 hours or more before using Evo. The bottle needs to warm to room temperature before use. A sudden temperature change could cause the bottle to crack.

Choose a position in a room with a temperature between 20 and 24ºC and (69-75ºF).
Place Evo away from draughts to prevent slow operation. Draughts may also cause the candle to go out.
Keep Evo away from children and animals to prevent breakage.
Place Evo away from sunlight to prevent fading.
Do not place on carpets or block the ventilation spaces beneath the lamp.

Setup

  1. Place the glass base on a level surface. A heatproof mat may be required depending on the surface.
  2. Place the tealight in place in the glass.
  3. Place the bottom metal support onto the glass, ensuring it is properly lined up.
  4. Place the bottle on top of the bottom metal support and the metal cap on top of the bottle.
  5. Light the tea light through the opening in the base.

Use

Evo will take between 40 – 50 minutes to warm up, depending on the surrounding temperature and the brand of tea light used.
After 4 hrs use, or before, gently blow the tea light out without touching the product as it will now be hot.
Please use a new tea light every time you use the product to avoid changing it whilst mid-operation.
Please clean the base of the bottle before use every time. This will clear any soot that the tea light may have deposited onto the base of the bottle.
Use only the small 4-hour tea lights as the long-lasting ones will burn for too long. [One single wick tealight candle, maximum size 1.5 in. (38mm) dia. x 0.63 in. (16mm) high.]

Warning!! This Is Not A Toy!

  • Do not use Evo with Neo bottles or old Telstar or Baby bottles. Neo bottles have a plastic coating that will melt. Older Telstar and Baby bottles may sit too near the candle, only use bottles bought from Mathmos in the last two years.
  • Never use for more than 4 hours at any time as the product will become dangerously hot.
  • Never touch the bottle or metal parts whilst the product is operating as they become very hot.
  • Always allow one hour after use to let the product cool down before touching it or the tea light.
  • Never move or shake the bottle when in use or for one hour afterwards, as this will cause irreparable clouding.
  • Do not leave the product unattended with small children or animals.
  • The bottle’s contents are not dangerous and can be disposed of normally.
  • Should the liquids be spilt onto the skin or come into contact with the eyes, pour on cool water; if symptoms appear, please visit the doctor.

Mathmos Candle Lava Lamp Instructions

Use of Candles

Always read and follow the manufacturer’s instructions supplied with candles.

  1. Never leave a burning candle unattended.
  2. Burn the candle out of the reach of children and pets.
  3. Trim the wick to about 1cm (1/2”) before lighting.
  4. Remove all packaging before use.
  5. Do not burn candles on or near anything that can catch fire.
  6. Do not place candles in a draught.
  7. Keep the wax pool clear of matches and other debris to avoid flaming if the candle overheats and flares; cover with a damp cloth.
  8. Do not use water to extinguish the flame.